
|

Time to gear up for another project and I find that I am in need of yet another thermometer. It's been over a year since I modified my last Radio Shack thermometer and I've received word from a number of people that the model I last modified is no longer available. Initially I though this was bad news, as I've enjoyed great service from the two previous thermometers. As it turns out, the newer version of the Indoor / Outdoor thermometer is even better for my purposes than its predecessor.
The purpose of this project is to modify
the thermometer so that it is able to measure remotely on both the indoor
and outdoor scale. When the unit is purchased, the outdoor temperature
is measured by a plastic encased thermistor at the end of a 10 foot wire.
The indoor temperature is measured by a bare thermistor mounted to the
thermometer's circuit board inside the plastic case. The circuitry
for the outdoor thermistor is able to read from -58°F to +158°F
(-50°C to +70°C). The circuitry for the indoor thermistor
is set to read from +32°F to +122°F (0°C to +50°C).
Conveniently, the thermistors have the same values so they may be swapped.
This will allow the smaller thermistor to be placed directly on the processor
where there is a greater temperature range and the larger probe to be placed
on the heat sink or in the computer case where there is less of a temperature
swing. Ideally it would be better to have the larger range for both
thermistors, but what do you expect for modifying a $15 part.
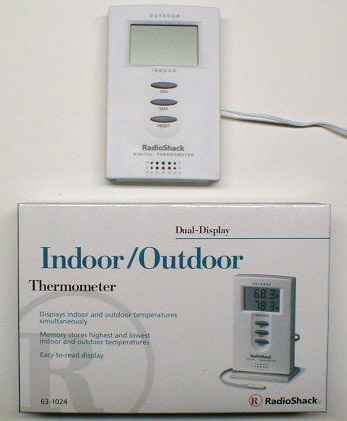 |
I purchased the Radio Shack model 63-1024
Indoor / Outdoor Thermometer for $15. I have seen them go on sale
for less from time to time. Even at $15, and an hour or so to modify
it to measure remotely on both scales, I think it's time and money well
spent. Not to break the bank, but you'll also need a single AA battery.
For tools and additional parts, you'll need a soldering iron (thin, pointed
tip preferred) some 60/40 electrical solder and a few inches of 1/8" heat
shrink tubing. A sharp small phillips blade screwdriver, a pocket
knife, a razor knife and a small round file are also needed.
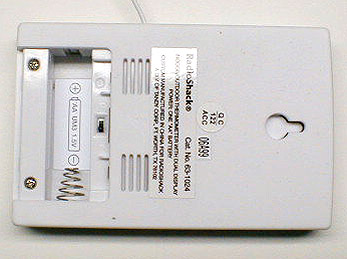 |
To get started, there are two philips head
screws to remove from the rear of the case. Once these are removed,
gently pry the case halves apart with a dull knife or other thin bladed
tool. There are two plastic tabs that are about even with the display
window that will need to be gently forced apart. Take your time and
work around the case a few times to loosen up the plastic. If you
can help it, you don't want to break these tabs.
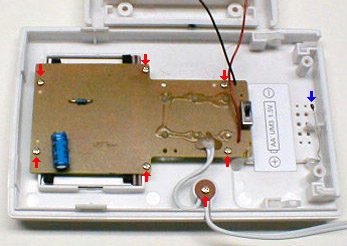 |
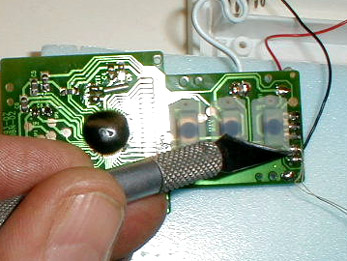
Once the rear of the case has been removed, you'll find that it is still attached to the circuit board by the two battery wires. They're just long enough to allow you to work on the board, but not long enough to make it easy to lay both sides flat.
The next step is to remove the six philips screws (red arrows) that hold the circuit board to the case and the one screw that holds the outdoor probe wire. These are *really* small screws and require a sharp pointed phillips screwdriver. I suppose that if you didn't have one small enough, a pocket knife blade could work. Be careful to use enough downward pressure to keep the screwdriver blade tight in the screw head. You don't want to strip out the screw heads.
One improvement (at least for those of
us modifying the thermometers) is that the inside thermistor now has leads
that are about three inches long. This is a big improvement over
the 3/8" leads on the previous versions I played with. The thermistor
is indicated by the blue arrow.
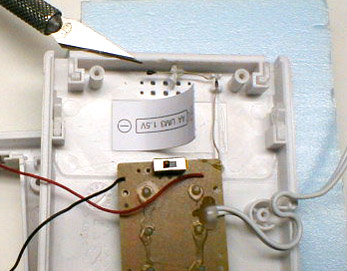 |
Once the screws are out, it will be necessary to pry up the battery position label to free the thermistor leads. The thermistor leads are also held in place by a couple dabs of clear silicone sealer which need to be pried from the case. A razor knife makes easy work of this.
The switch in the center of the picture
is for choosing Fahrenheit or Celsius and can also be seen in the number
2 picture above.
 |
Now that you have freed the circuit board
from the case, turn it over and you'll see where the indoor thermistor
attaches to the board. The next step is to desolder the thermistor
leads. An inexpensive "pencil-type" soldering iron works fine for
this. If you are not familiar with soldering, be sure to pre-tin
the tip of the iron. A dirty tip or
one that has not pre-tinned is the most common reason that newbies to soldering
have problems. You will just need to touch the hot iron to each solder
joint and gently pull the thermistor leads from the board.
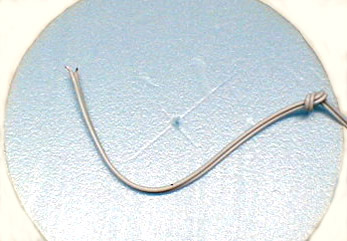 |
The lead for the outdoor thermistor is
about 10 feet long. Unless your computer or project is a long way
off from where you are going to place the thermometer, you will be able
to do what I did - cut the lead in half. This gives you a 5' wire
coming from the outdoor lead with no thermistor attached where you will
attach the old indoor thermistor and an unattached 5' wire with the outdoor
thermistor that will be attached to where the indoor thermistor has just
removed from the circuit board. Loosely knot the wire a few inches
from the end and strip the insulation to expose the copper strands.