
|
Maybe the big difference in heat sink and processor temperature shocked me or maybe it's just that in things mechanical and electrical I like overkill. Anyway, I decided when it came to the heat sink I wanted, "more is better." I spent a couple of nights going through the many great heat sink sites and reading all the tests I could. There are a number of sites devoted to which of the many heat sinks perform best. However, I couldn't find an air cooled heat sink that produced the results I was looking for. Peltier coolers keep the processor cool, but at the cost of heating up the rest of the components in the case. That was definately not what I was after. Fluid cooling, while an efficient means for getting rid of heat, was not where I wanted to begin (maybe later). I decided that I what I wanted was a larger heat sink than anything I had seen commercially available for the computer market. Time for Mickey Mouse engineering again.
The purpose of a heat sink is to transfer
the component's heat over a larger area enabling it to give up its heat
to the surrounding air more quickly. The more surface area the heat
sink has, the more heat you can transfer from the component. The
mass of the heat sink also plays an important part here. The greater
the mass, the more heat that can be removed and stored. With this
in mind I headed to the basement and my store of parts. I have quite
a few large 12 volt, high amperage power supplies in various states of
repair. All of these have big heat sinks. After some measuring,
I found one that would actually fit inside the area of the case that it
needed to go. One slight problem I encountered here was not
the size, but the weight of the heat sink. At ¾ pound, it's
12 times heavier than the 1 ounce heat sink I was replacing. Neither
of these weights include the fan. This is way to much weight for
the CPU socket to support. I ended up fabricating a bracket out of
some sheet aluminum to support the additional weight. The bracket
sits on a ledge of the case just above the processor.
 .
.
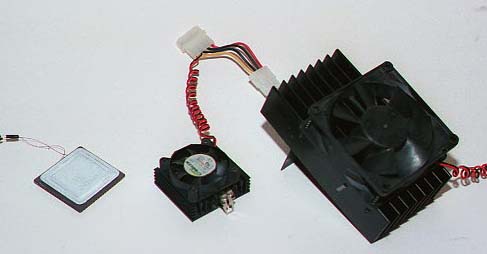
Left: Size difference between processor,
original heat sink, and my larger version.
The large fan was remover from an old
386 power supply (3" 12 volt).
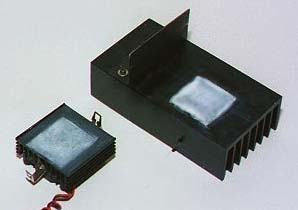
Right: Under side of both heat sinks. The white area is the thermal paste from CPU.
The top of the AMD processor (the metal part) has an approximate surface area of 3.25 sq. in. The CPU Cooler heat sink I started with increases that surface area to 30.0 sq.in. That's over 9 times the area for getting rid of heat. The fins on that sink are spaced about every 1/8". A definate improvement over no heat sink, but this K6 runs hot when overclocked.
The new heat sink has a surface area of just over 115 sq.in. That's 3.8 times the surface area of the CPU Cooler heat sink. The fins are widely spaced at about 1/4" between them. While better cooling could be had by having more closely spaced fins, this setup should suffice for now. Using a heat sink with the cooling area made of pins instead of fins would also increase the surface area; however, that design would not allow me to channel the heat away from the board. Instead, it would spread the heat toward the other components.
 |
There wasn't much to assemble here. The only assembly, beside building the bracket to support the extra weight, was to find a way to attach the sink tightly to the processor and to attach the fan to the heat sink. Most commercial heat sinks of decent quality use a spring clip bent from flat steel. My heatsink was too large to use this method. I ended up with 2 helical springs attached to posts that were drilled and tapped into the heat sink's sides. These were then stretched to fit over the tabs on the side of the CPU socket. Not an elegant solution, but effective. I got lucky and attaching the fan solved itself by being just the right size for 4 screws to grip the outside of the fins.
OK, so how did this big, ugly heat sink
perform? Not bad. The following chart reflects the temperatures
I measured after an "idle test" and then running the Quake demo screen
for 1 hour. Again, this is with the case cover removed.
|
Heat Sinks |
°F (°C) |
°F (°C) |
°F (°C) |
°F (°C) |
|
CPU Cooler |
|
|
|
|
|
CPU Cooler |
|
|
|
|
|
Recorded CPU Cooler |
|
|
|
160.0 (71.1) |
|
Homemade |
|
|
|
|
|
Homemade Heat Sink |
|
|
|
|
|
Recorded Homemade |
|
|
|
|
The "idle" temperature marks were observed running Rain 1.0 and allowing the system to remain idle until the temperatures reached their lowest point. The "highest temp" marks were obtained by running the Quake demo for an hour and then running back-to-back time demos at high resolution until the processor temperature either stopped rising or went off the scale. Notably, it took only 3 time demos for the CPU Cooler to go off the scale, while the homemade cooler stopped rising after 4 runs.
I'm sure that by using a more massive heat sink or one with more fins, I could have brought the temperature down even more, but all I was looking for was a system that ran cool enough not to be dangerous to the CPU and allow me to start testing case cooling configurations.
As to what has been proven here, not much.
It's common knowledge that a larger heat sink will perform better than
a smaller one. What I found interesting is that even with this huge
sink and it's anodized black finish, extremely smooth contact area, and
large mass still gets quite warm when the system is pushed. This
leads me to believe that the majority of heat sinks available for the overclocked
K6-233 are not up to the task of keeping it cool. Add the fact that
many of the tests I have read list only the heat sink or motherboard temperatures
and not the CPU temperature, and I would bet that a lot of people, like
me, would be surprised to find out how hot the processor is actually running.
|
|
|
|
|