
|
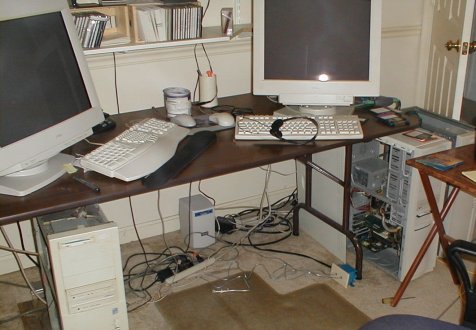
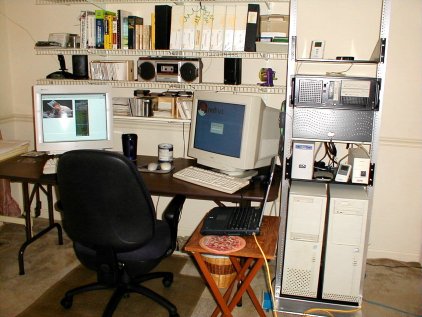
It seems that I have been rather lax in keeping my computer room clean. No, that's not just my wife talking
;-), it's true. It had gotten to the point where three boxes (plus the laptop), two monitors and a KVM to control them, a myriad of water
coolers, heat pipes, and other assorted experiments had entirely taken over the extra upstairs bedroom that I call the computer room. I'd
conveniently shut my eyes to the mess for quite a while - blaming involvement in some project or another (you know that "I'm busy" line, right?).
All of this was about to change.
 |
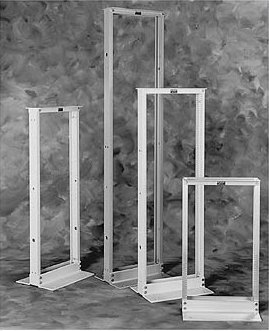
As it happened, I stumbled across an eight foot tall by 19 inch wide computer rack. Though I had never considered having a computer rack in the house, the more I thought about it, the more I thought that a rack would be a very cool thing®. After a bit of questioning and negotiating, I had a rack for a good price. A good price? How about a quality 8 foot aluminum rack for $10? The salvage cost of the scrap aluminum was worth more than that! Darn, I love a great deal!
The rack I happened upon is an 8 foot Chatsworth
self support rack. The one I bought (there were a few) had two -
four plug, rack mounted, power strips (picture)
as an added bonus.
 |
The first obstacle with getting this rack up was that I had no rack-mount case and the rack came with no shelves for my consumer-type, full-tower cases. I spent some time going through the Chatsworth catalog and calling their local distributors. After $167 spent, I had two half-shelves and one 20 inch full shelf. Expensive? Yes. However, I was on a mission to clean.
The next step was to find a rack-mount case to fit in the new rack and hold my new motherboard and components. Even though I am not exactly a stranger to rack-mounts in an enterprise environment, I had no clue as to what size of case to get. After some research, I found that you can break down the rack-mount cases as follows.
Typical racks will accept rack-mount
cases 19 inches wide.
A rack-mount case height is measured
in "U's" (Universal measurement).
For each "U," the height of the case
is about 1.75 inches.
1U and 2U cases typically need a riser
card (an auxiliary card to connect the PCI cards to the motherboard) to
mount PCI cards.
3U and larger cases should accept full
size PCI cards mounted at a 90° angle to the motherboard (the typical
mounting configuration that home users are accustomed to).
Typical rack-mount case specs:
1U - 1.75" (44.45mm) Height,
19.0" (451mm) Width, 19~21" (451~553mm) Depth.
Pluses - More cases can be mounted in
a rack (lowering the floor-space cost in an enterprise environment).
Minuses - Need for riser card to mount
PCI cards. Will only accept 1 to 2 PCI cards. Power supplies
are much more expensive. Worst (of the rack-mount cases) in cooling
capabilities (because of their small internal area). High performance
heat sink will probably not fit in case. You will not want to overclock
the processor in this case unless you have an exceptional cooling solution.
2U - 3.50" (88.9mm) Height, 19.0"
(451mm) Width, 19~21" (451~553mm) Depth.
Pluses - More cases can be mounted in
a rack (lowering cost in an enterprise environment).
Minuses - Need for riser card to mount
PCI cards. Will only accept 2 to 3 PCI cards. Power supplies
are much more expensive. Second worst (of the rack-mount cases) in
cooling capabilities (because of their small internal area). High
performance heat sink will probably not fit in case.
3U - 5.25" (133.35mm) Height, 19.0"
(451mm) Width, 19~27" Depth.
The 3U case is somewhat of a bastard size.
You won't find many on the market.
Pluses - More room for PCI cards.
Room for 3 to 5 cards is the norm. Most cards will fit at a 90°
angle to the motherboard. There is room to use a standard ATX power
supply. Better cooling than 1U and 2U cases. Will accept a
wider range of high performance heat sinks.
Minuses - Takes up more rack space.
Space is money in an enterprise environment.
4U - 7.00" (177.8mm) Height, 19.0"
(451mm) Width, 19~27" Depth.
The 4U case is great if you have the room
to mount it.
Pluses - Room to mount a full array of
PCI cards - 3 to 6 cards is typical. PCI cards will fit in a standard
configuration (90° angle to the motherboard). Will accept
standard power supplies and be able to make good use of the "bottom or front intake
- rear output (power supply) fan configuration." Also has the room for an additional
power supply if redundancy is needed. Will accept most of the
largest high performance heat sinks that the aftermarket has to offer.
Minuses - Takes up more rack space.
This is typically the largest of the rack-mount cases used for single purpose
servers in a small enterprise environment.
5U to 8U - These cases are specialty items with room for a motherboard, plus RAID arrays, or multiple redundant power supplies. These are out of the scope of most home users.
5U - 8.75" (222.25mm) Height
6U - 10.50" (266.7mm) Height
7U - 12.25" (311.15mm) Height
8U - 14.00" (355.60mm) Height
Big Iron - beyond rack mounted cases
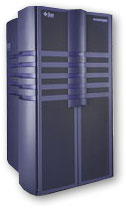
For a perspective of the beyond
category, the company I work for has some Sun
E10000 Enterprise Servers coupled to Sun
StorEDGE disk arrays that handle our administrative tasks. No
racks are required here (though the rack of web servers I work with [remotely]
are right beside these behemoths). The Sun boxes are big, floor-standing
machines which our company houses in a data center (along with other companies'
boxes of smaller and larger stature). My first trip to the data center
to set up a couple of web servers knocked me out! It was impressive
to see the rows and rows of big iron that populated the floor of the data
center! (A computer hardware lover's paradise).
 |
I have to say that the first time I logged
on to that big Sun/Solaris box after seeing it in person (even though I
had used it many times before) gave me one heck of a rush. Yeah,
I'm a geek.
Finding a case
Off to the usual places to try for some
reviews of what's the latest and greatest. Initially, I didn't have
a lot of luck in this search. Lots of floor standing, consumer type
cases, but very few rack-mounts. After doing a search on google for
a "4U case" and checking out a multitude of sites, I ended up at KRI
Computer (also known as www.servercase.com). This is what grabbed
my attention:
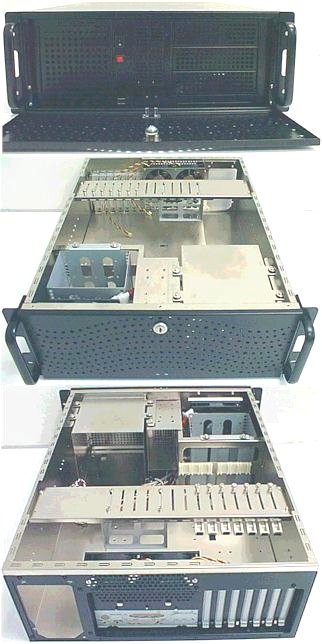 |
It looked pretty nice for $140, though it didn't come with a power supply. The shipping was expensive, but that's to be expected for the 40+ pounds that the package weighed.
I was impressed with the folks at KRI Computers. I placed the order online for the case and a Seventeam 400 watt Power Supply. I received a call from them the next day asking me what application I would be using the power supply for. I answered with the motherboard model and they confirmed that the power supply was OK for that application. It was a nice gesture and even though I had researched the power supply before ordering it, I appreciated the attention to detail that KRI showed.
I chose the cheapest (slowest) shipping method and was sent a UPS ground shipping number (7 days from the West coast to the East coast) by email. The package arrived on time.
Up to this purchase, the most expensive
case I had purchased was an In-Win Q500N, which included a 300 watt power
supply, at around $100. I was impressed with what extra $115 bought
me. ($140 for the case + $75 for the P/S.) Yes, this is a big jump
in price, but the jump in quality far outweighed the jump in price.
I will get into the reasons why when I detail the building process later
in this article.
What should I buy
I have to say that I wasn't really feeling that much of a need to upgrade. My P3 at 1 gig was doing everything I could ask for in a processor. However, my "upgrade criteria" had been met. When the processor I'm running can be upgraded to twice it's speed, it's time to upgrade. It was well past time.
If you don't read the hardware sites daily, you can get out of touch with the hardware market quickly. I was out of touch. There is such a plethora of motherbord/processor combinations on the market, that even if you are fairly knowledgeable, the choices can be staggering. I hit my favorite hardware sites; Tom's, Anand's, Lost Circuits, Ace's Hardware, Hard[OCP], Dan's Data and searched Google and the Google News Group Archive for any and all info I could get on what was the "best processor of the week." As always, there is much to be said for AMD's offerings, though the advance word (after much hope and speculation) was that the 0.13 micron Thoroughbred was going to fall a bit short of the hoped for performance. However, at the time I was ready to purchase (May, 2002) the P4 - 1.6A was drawing rave reviews from overclockers for an easy 2+ gigahertz at stock voltage and with the stock "boxed" heat sink.
After much reading and consideration I decided on:
Pentium 4 - 1.6A
MSI 845 Ultra-ARU
512 MB OCZ PC3000 DDR RAM
Western Digital 80 gig
These parts would be added to:
2 - 20 gig WD drives in Raid0
Asus 7700 geForce 2
Diamond Fireport SCSI card
Plextor SCSI 40 speed CD
Plextor SCSI PlexWriter CDR
LinkSys 100 LNE network card
I ended up purchasing the board, RAM, and processor from New Egg as they had some of the better prices on the net, along with fair shipping charges, a good reputation and enough turnover that I felt that I would be getting a current version of all that I ordered. This turned out to be correct and the order was on time and shipped well.
This is - by no means - a "state of the
art" box, but it is certainly a nice upgrade and is more than I needed
in power. If I was an avid gamer, the video card would need an immediate
upgrade - and I may do that in the near future - but my main focus lately
has been on programming.
The Case and Assembly
I unpacked the case and was quite pleased
with what I found. This 4U rack-mount is certainly a nice piece of
work. The outside of the case is coated dull black and the interior
is sheet metal left bright. Instead of the sharp edges found on cheap
boxes, or the folded edges found on some upscale consumer boxes, all of
the edges on this box are finished and deburred. You'd almost have
to try to cut yourself while working inside this box.
The case has a locking door with plenty of cooling holes and two Lucite plugs to transmit the light of the power and drive activity LED's from the front panel to the outside of the door. There is room on the front panel for 3 - 5¼" drives (CDs or whatever) and 2 - 3½" drives (floppy). The 5¼" bays are mounted horizontally and the 3½" are mounted vertically. There is also a 5" square grill with a removable filter that cleans the air sucked in by the Sunon KD 1212PTB1-6A (120x25mm) ball bearing fan in the front of the case and expelled by a pair of 80x20 bushing fans in the rear. The filter is removed by a single phillips screw in the front of the case. Additionally, to mount your hard disk drives, there is a total of 5 - 3½" drive bays - three in the front and two in the rear.
The case dimensions are 7.0" (177.8mm) Height, 19.0" (451mm) Width x 22.5" (571.5) Depth. The weight of the empty case is approximately 40 pounds (18 kg).
As I started the assembly, the next thing
that caught my eye was that all of the front cages that are used
to mount the CDROMs, floppy drives and disk drives were rubber mounted.
Impressive! The design and placement of a rubber washer for each
attachment screw for the cages probably wasn't that much of an expenditure
for the manufacturer, but the feature is appreciated and should keep the
vibration and noise of the drives down a bit.
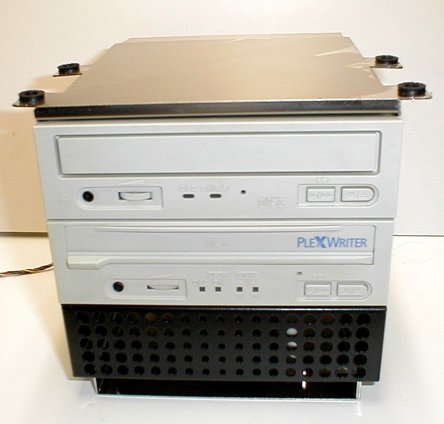 |
I mounted the motherboard and all of the
drives, then turned my attention to the boxed Intel P4-1.6A (S spec. SL668
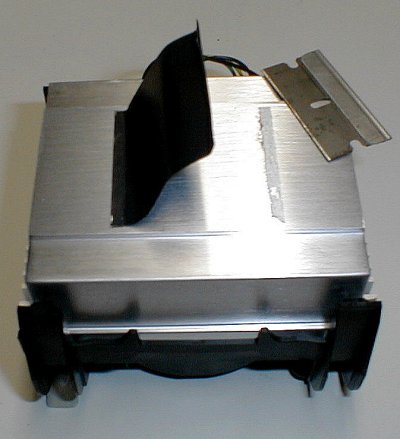
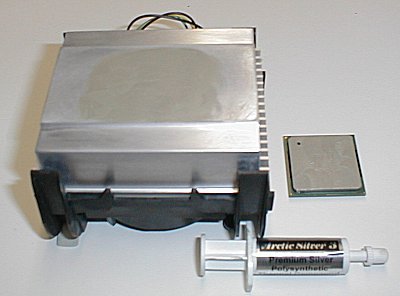
- packing date of March 20, 2002). The first thing that needed to
be done was to remove the thermal pad from the heat sink, lap the sink
to get better contact with the processor and check the P4's slug for flatness.
Both the sink and the slug took very little lapping to get them flat.
 |
 |
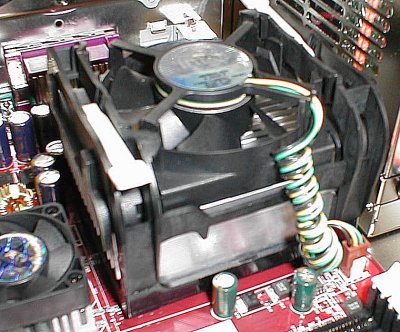
With this being the first P4 I have put
together, I was impressed with the heat sink hold-down assembly.
After years of dealing with many types of spring clips, the dual locking
arms of this setup were a welcome change from the hard to install metal
spring clips.
 |
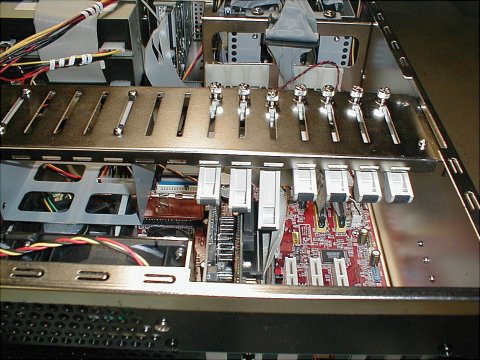
Now that the processor was installed, it
was time to finish up by installing the video, SCSI, and network cards.
For the time being I would use the onboard sound. Because of the
"flat layout" of the 4U case, some of the cables were stretched to their
full length with very little slack. This made for a bit of a messy
looking box. The next time I make it to one of the local computer
shows, I'll pick up some better fitting cables.
 |
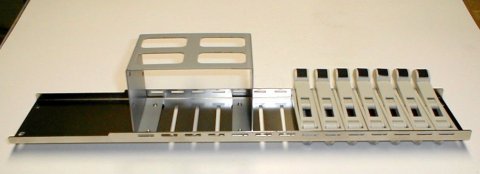
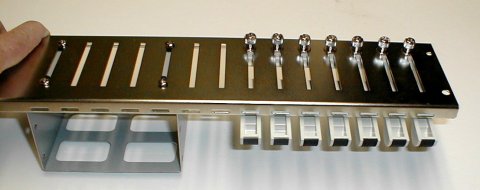
The last step of the assembly involves
a device I have only seen used on computer cases meant for an enterprise
environment. For lack of a better description, this item could be
called a AGP / PCI card hold-down (maybe a "card keeper?"). The purpose
of the device is to hold your cards firmly in their slots. I have
seen occasions where the metal edge of a card does not line up perfectly
with the computer case. Tightening the single screw on one edge of
the card can lift the opposite end of the card from it's socket.
After moving the case around or bumping it, the free end of the card can
work loose from the socket causing the device to stop working. This
hold-down is designed to prevent this. One more nice feature of this
case.
 |
 |
 |
The remainder of the assembly went without a hitch - with the exception of trying to get the RAID array from my previous box (two 20 gig WD drives in a RAID array from a modified Promise Ultra 66 [to Fasttrack 66]) to be recognized by the on-board Fasttrack 100 of the MSI board. Reformatting the drives was necessary, but it was no big deal as I had anticipated that I might have problems and had backed up the contents of the 40 gig array before assembling the new box.
With the stock heat sink of the boxed Intel P4 1.6A, I was able to easily push the processor to 2.24 gigs at stock voltage. I'm fairly sure that with a little active cooling in the form of a water cooler or a peltier / water cooler combination I could push this processor higher, but the current speed is fine for the time being. In an 78°F (25.5°C) room, the idle temps are 100° - 102°F (37.7° - 38.8°C). Pushed hard, the processor hits 118°F (47.7°C). Not too bad. This is with the CKS400's front fan turned down in speed to quiet it down a bit. (Please see the article on tuning the fan speed for more information on how this was accomplished.)
All in all, this was a fun upgrade. I haven't had a single crash that I could attribute to hardware or heat failures, though I have had a couple of crashes with Windows 2000 related stuff - but hey, who's counting those....
If you happen to find yourself in the situation
of wanting to clean up your computer room by getting all of your hardware
into one area, a rack is definitely worth considering. If you decide
to go for a rack, the Chatsworth is a good option and the servercase CKS400
is a worthy case to put in it.
 |