
|
When you consider that the Celeron 300a can be overclocked to half again its rated speed, the question of heat is bound to come up. While I don't consider the Celeron a particularly hot chip compared to my previous K6-233 o/c'd to 3X83, cooler is better than hotter when it comes to CPUs. The .25 micron manufacturing process and the chip's low voltage requirements coupled with using a good heat sink / fan combination and decent case cooling will allow you to run this processor as cool as any overclocked processor I have seen.
Heat sink basics
To be able to cool the electronics inside
the processor, the processor is encased in a metal housing. Intel
refers to this metal housing as the "slug." The slug is attached
to the printed circuit board, with the whole assembly known as a S.E.P.P.
(single edge processor package). The S.E.P.P. or circuit card as
it is sometimes known, is made of a heat and electrically insulating material.
Therefore, the only area of the S.E.P.P. that is able to conduct heat with
any efficiency is the slug. The surface area of the slug measures
a little over 1 square inch. This is not a lot of area to dissipate
the amount of heat that processor generates. By attaching a heat
sink to the slug, you can increase the surface area that the heat may be
transferred to and in turn, transferred to the surrounding air. Adding
a fan or fans to the heat sink allows more air to come in contact with
the heat sink and carry away more heat. Given the size constraints
of the computer cases we have, the more mass the heat sink has, the more
heat that can be removed from the slug and the greater its surface area,
the more heat that can be given off to the surrounding air. In this
case, bigger IS better.
Dual Heat Sinks
While I was researching the Celeron A,
(before I purchased one) I came across an article on cooling the Celeron
by using two heat sinks; one attached to the side with the slug, and one
attached to the rear of the circuit card. Having never seen a Celeron
up close, I wrongly assumed that there was some sort of metal on the rear
of the circuit card to conduct the heat away from the processor to the
second heat sink. This was not the case. There is nothing on
the rear of the card aside from some circuit traces covered by a clear
coating.
Trying to cool the processor by attaching a heat sink to the back of the circuit board is like trying to cool a cooking pot by placing a heat sink on the wooden handle. While it may do something, it is not a very efficient way to remove heat from the pot or, for that matter, the slug. While I am presently running dual heat sinks on my celeron, the extra sink is used to allow me to attach the modified PII heat sink to the S.E.P.P without bending the circuit card. I have covered the rear of the second heat sink with duct tape to prevent scratching the circuit traces on the card. The tape also works as an heat insulator, which is not exactly a plus in terms of cooling. With both the circuit card and the tape acting as insulators this rear heat sink is well removed from the possibility of removing heat from the slug. The author of the dual heat sink article suggested using tape with a square cutout to line up with the back of the processor and using a layer of thermal paste to transfer heat from the card to the heat sink. I tried this and found little or no difference in the temperature of the heat sink. If the heat sink's temperature rose, this would indicate that it was drawing heat from the processor. It does not. I have come to the opinion that while the use of dual heat sinks looks cool, it does little or nothing to help cool the CPU. There is a small amount of heat transferred through the screws that connect one heat sink to the other, but this is not enough of a connection to make much of an impact in cooling the processor.
Thermal Paste
In an perfect world, there would be no
need for thermal paste. The top surface of the slug and the bottom
surface of the heat sink would be perfectly machined and the metal would
have no voids, holes, scratches, or irregularities. The two pieces
would fit together so perfectly as to become one piece. But, this
is not the case. Thermal paste is designed to fill small voids/pores/holes
in the metal's surface to prevent air pockets which would interfere with
heat transfer. For this purpose the paste works very well; however,
while the paste has 20 to 30 times the heat conducting properties of air,
it does not conduct heat as well as metal, and it is not meant to be spread
so thickly as to create a barrier between the heat sink and the slug. Melcor,
a manufacturer of heat sinks and thermal devices gives their
ratings of thermal properties of thermal paste using a thickness of
1/1000th of an inch. A human hair is roughly 2/1000ths of an inch.
Thermalloy,
another heat sink and thermal device manufacturer, has an informative chart
on the benefits of using thermal paste in small quantities here.
Warped Slug
While I was modifying a PII dual heat
sink to fit, I checked the Celery's metal slug for flatness. To make a
long story short, it wasn't. The perimeter of the slug was raised above
the center by 3 thousandths of an inch or more. I could hold the
heat sink flat against the chip, put it up to a light and see light come
through what was supposed to be a very close fit. To make sure that my
eye's weren't playing tricks on me (gettin' older, ya know), I coated the
bottom of the heat sink with a very thin coat of thermal paste and then
pressed the chip against the heat sink. The only part that made contact
were the edges. Not too good for heat transfer.
Now I know that there are many who would have said that the answer to this would be to use a thicker coat of thermal paste; however, we know that applying the compound in thicker quantities will actually reduce the transfer of heat. The answer for my Celeron was to get the slug and heat sink to be as flat as possible.
To get the slug flat, I taped the whole Celeron SEPP with non-sticky house painters tape (except for the metal slug) to protect it. I then attached a sheet of damp 400 grit wet/dry auto body type sandpaper to a flat glass table top with duct tape. I applied a coat of magic marker to the top of the warped slug to work as a sanding guide, then slowly and carefully sanded the top of the slug, making sure to keep the slug parallel with the table while using a circular sanding motion. It took a while and the edges of the chip began to show copper before all of the magic marker was removed and the slug's surface was flat. I repeated the application of magic marker every so often to show any low spots still remaining. I did the same to the back of the heat sink for good measure. I then polished the surfaces with damp 1000 grit wet/dry paper.
When I thought that the surfaces of the slug and heat sink were flat, I cleaned them up and applied a very thin coating of thermal paste to the back of the heat sink. I pressed the slug into the paste coated back of the heat sink and wiggled it back and forth a bit to get it as good of contact as possible. After separating them carefully, I examined the top of the slug. There was a nice even coat of paste that had been transferred to it. I have ended up with a slug and heat sink that mate so well that they almost stick together from surface tension, like two pieces of flat glass. Better contact and better heat transfer.
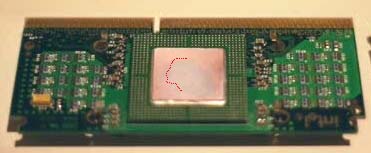
This is the finished "flattened" slug.
The left side of the
slug has the boundary between the sanded
and unsanded
areas highlighted in red to show how
much material
had to be removed to get the slug flat.
As you can see,
much of the silver colored coating
was removed which
exposes the copper layer.
Now, those of you who know me know that I will try just about anything to get an edge in performance. This is one of those occasions where I am very pleased with the results I have received, but am a bit hesitant to recommend this procedure - because.....Following these instructions will probably remove the markings from the top of the slug and almost certainly void any warranty you have on your CPU. Perform this procedure at your own risk.
504 MHz?
OK. The big question seems to be,
"Did this help to get this chip to clock at 504?" Unfortunately,
the answer is no. While I was finally able to reach 504, after about
10 minutes in Windows, the system re-booted on its own. During this
spontaneous re-boot it totally corrupted the C partition. NO savable
files. Just for the record, I'll add that the CPU temperature at
the time of re-boot was a relatively low 89° F. Hardly warm enough
to accuse heat as being the reason for the crash and mass destruction of
my files.
After performing a "Format C:" and re-installation of OSR2, I did have some success running at 504 with the L2 cache disabled. While it was not stable enough to perform any benchmarks, the temperature of the CPU was only about 3° F higher at idle than running at 464 MHz. With my chip, disabling the cache seems to play a bigger role in reaching 504 than the temperature of the processor. (At least, so far...)
To the reviews
Now that your slug is perfectly flat (hopefully),
it's time to choose a heat sink / fan combination to attach to it.
I have a few reviews of heat sinks on the following pages. I would
like to include some more, so if you are a manufacturer or distributor
of Celeron heat sinks, please contact me. I would love to test some
more products.
|
Introduction |
|
|
|