
|


pressure than I would be subjecting it to. |
The Pump
I knew from the beginning that I didn't
want to use a submersible pump. I hoped to be able to make this system
self contained and portable. Another consideration was that I didn't
want the impeller shaft to have a seal that could wear and ultimately leak.
The solution was to look for a magnetic drive pump. Mag-drive pumps
have a magnetized impeller shaft which is not directly attached to the
motor shaft. Instead, the motor shaft turns a magnet, which in turn
turns the impeller shaft. This means that the impeller and shaft
can be housed in a water-tight compartment with no seals to wear out with
use. This also means that they're a bit more expensive than a pump
without the mag-drive.
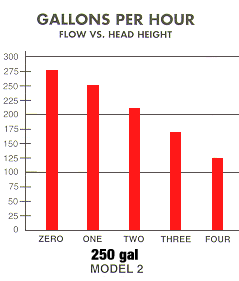
I chose one made by Danner Mfg. Inc. called the Supreme Mag-Drive Utility Pump. The model is # 2 and it is rated at 250 gallons per hour at a one foot head height. I was pumping up to about a foot and a half and restricting the flow a bit. I measured the output at just over 2 gallons per minute.
I bought the pump online at Aquatic
Ecosystems.
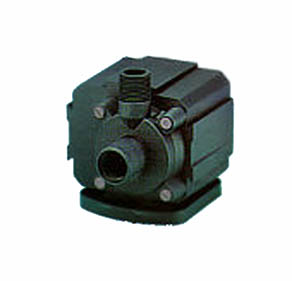
Supreme Mag-Drive Model 2 |
|
The Tank
I knew that I wanted some easy way of
filling the system and removing air bubbles. What I didn't know was
how I wanted to do it. I considered putting a bleeder bolt somewhere
high in the system, but the highest point would be the heat sink.
That didn't seem like the best place for an opening in the system.
I though about how it was handled in automotive applications and adapted
my tank from that . The tank is a closed PVC box with a rubber gasket
to seal the lid. I have the container filled about 3/4 of the way
with water. I installed two water inlets below the water line in
the container. As the pump runs, the water is pumped in and out of
the container. If air happens to be in the lines, the air rises into
the air pocket at the top of the container, while the inlet side continues
to draw water. I also made a fitting to attach temporarily to either
of the fittings inside the tank to prime the system. The tank holds
about a pint of water.

|
Click on image for a larger view. |
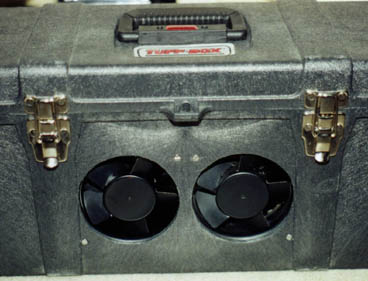
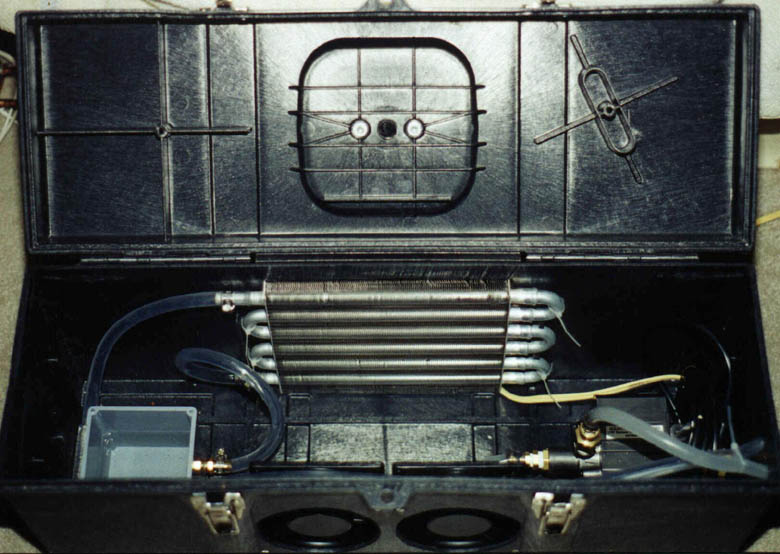
65 CFM - 2200 RPM AC fans. |
transmission oil cooler - turned radiator. |
Performance
The difference in water cooling as opposed
to an air cooled sink is pretty amazing. Once you try it, going back
to air cooled is lacking. After a month or so of running water cooled
with a 40mm TEC, I decided to remove the TEC to see what water at room
temperature would do. This was done more for a point of reference
than any real desire to run without a peltier. The tests for the
cooler without the TEC were done with the processor running at 464 MHz.
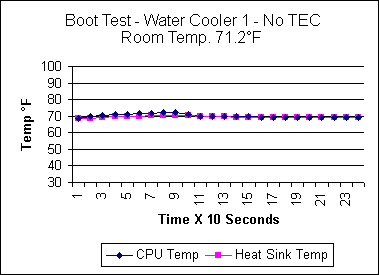
water temperature in the sink. The water temp ran between 1 and 2 degrees below room temp due to the room temp being measured a foot and a half higher from the floor. |
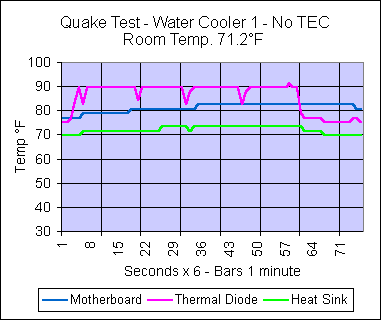
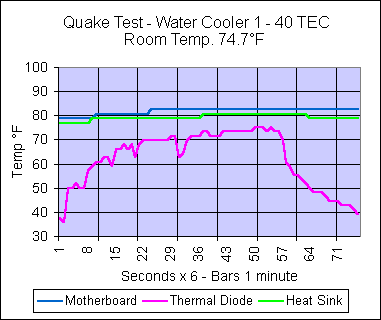
during the looped time demo of Quake2. The internal diode stayed at a respectable 90°. As usual, I have no idea what the BX6r2 motherboard sensor is reading! |
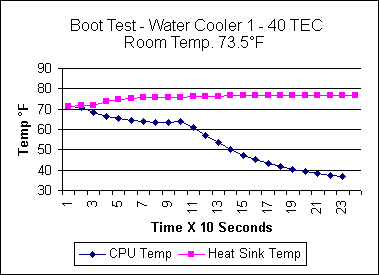
With a 40mm - 52 watt TEC and copper cold
plate attached to the cooler, I ran it for a couple weeks at 504 MHz.
I decided to try to push it up to 527 MHz. I was amazed when it not
only booted into Windows, but ran everything I could throw at it without
a hiccup. Pretty good for a processor that I once said would never
hit 504. The following tests were done at 527 MHz.
off rather slowly. However, with the thick plate, the temperature swings between the CPU at idle and running under stress are kept to a minimum. |
has a hard time keeping up with the heat produced by the Celeron at 527. The water cooler takes the heat without a problem. |
For a first attempt at a water cooled heat sink, I'm pretty pleased with the results. I was pretty sure that a single 40mm TEC was not going to be enough to handle all of the heat from the processor, but it did keep the Celeron cool enough to hit all the speed that my PC100 ram would allow. This was also the longest I had kept one sink on my Celeron in a long time. With the temperatures only reaching about -2° at the coldest, (usually when I was reading online) I didn't have a problem with condensation. The "cold" was kept to the area of the slug by the insulation.
All in all, this was one fun project. But, me being me, I had already been working on plans for a second water cooler. This one would be more conventional in design as I thought that the aluminum pins and copper base were overkill for a water cooled sink. The next sink would also have dual 40mm TECs. I'm looking forward to this!