HOME
What's New

CPU Cooler
Programs
Introduction
AmnHLT
CpuIdle
Rain 
VCool 2.0 
Waterfall Pro 
Current Tests 
Test Archives

UDMA Driver 
Tests 
Windows 95
Windows 98
Windows NT

Way 2 Cool 
Projects 
Compaq 1800T
1800T Temp Monitor
Celeron-A
Going for 504
More on 504
Cheap Sandwich
BX6r2 Diode Fix
Condensation
Lap that Slug
Celeron PPGA
Journey to 1080
Building an NT Box
Heat Pipe 1
Heat Pipe 2
Heat Pipe 2.2
gp_Temp
gp_Temp4
gp_Temp5

Heat Sinks 
Aavid
A&C Prototype Sink
Alpha P125
Alpha P521
CPU Cooler
FullWay
Tom's Sink
Water Cooler 1
Water Cooler 2
Water Cooler 3
Water Cooler 4
*
Water Cooler 6
Water Cooler 7

Way 2 Cool
Thermometer
Thermometer 2
K-6 heat sink
Case Cooling
Heat Sink Tester
More Case Cooling
Klamath heat sink
Q500A Cooling
My Server Temps
Temp Calculators
CKS400 Rack Case
Fan Controller
Cooling Links
Downloads Page

Tips and Trix
Dual Boot Win95 / 98
Dual Boot Linux/NT4
D-B Linux/Win2k
Hot Flash your BIOS

Family Stuff
Prom / St. John
Providenciales

Email Jim

By Charlie Wathen

Now for the last remaining steps. Pick up the heat sink assembly and hold it up to the light. Tilt the heat sink assembly on its side while looking between the CPU cartridge and heat sink. Make sure there is no light visible. If light is present, then the CPU was installed incorrectly and will require adjustments. Remember, the CPU cartridge must be flat on the heat sink in order to transfer the heat.

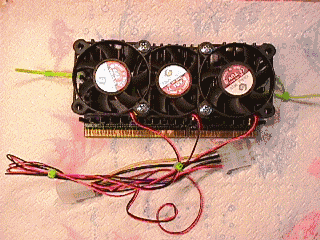
The last step is to re-install the CPU fan that was removed from the heat sink. The Global Win came with one fan and since I had several more of these fans, I decided to add one more to each side of the heat sink. This involved adding four extra-length self tapping screws, and wiring all the fans together. Since I don't like to use electrical tape, I used heat shrink tubing and a soldering iron for the wiring.

The final step now is to install the CPU cartridge into the motherboard. Remember to loop the outside cable ties over the P2 rails, then pull them snug. You will find that it does not need to be that tight. Don't forget to connect the four prong power connector, or your fans will not engage.
  Conclusion: Now sit back and enjoy your modification. I did not perform any temperature measurements, but after about 10 minutes running, I carefully placed my finger on the Tag RAM chip, and it was only warm to the touch. My earlier temperature measurements where taken by measuring the thermal transfer plate; therefore, I did not want to compare apples to oranges. With this in mind, the thermal plate temperatures BEFORE the modification ran in the range of 110 to 120°F. What a big improvement to the Klamath CPU! And as an added bonus, the L2 cache chips are now open to ambient case conditions, so they will run cooler too.